Posts

5 Top Considerations When Clipping Your Dogs Nails

5 Top Considerations When Clipping Your Dog’s Nails

Clipping your dog’s nails can be a stressful task if you are nervous about cutting them yourself. The first time clipping nails, most pet owners are afraid of injuring their pet. It is important to keep your pet’s nails short and manageable to maintain healthy paws and nail development. Ask your Veterinarian or pet groomer for the right tools to buy for the size of your dog. Here are some pointers to consider before you clip your pet’s nails for the first time.

Why is it important to keep your pet’s nails well groomed?

* To minimize the risk of nail bed infections, auto-immune disorders, and to monitor any abnormalities around the nail beds and paws.

* Maintain smooth, rounded ends; minimizing scratches on people’s skin and furniture damage.

* Shorter nails allow for better traction on pavement and flooring.

* Longer, un-kept nails can curl up and dig into the soft flesh of the pads.

* Un-kept, longer nails absorb friction and impact from the ground sending them back towards the nail beds causing sensitivity or pain.

When should you have your dog’s nails trimmed?

* Dog’s nails should be kept short enough to keep them from touching the ground while standing.Top 5 Considerations When Clipping Your Dogs Nails
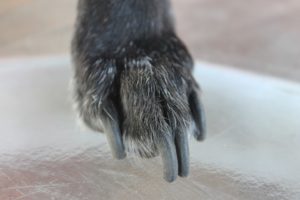
* When you hear clicking of the nails on flooring.

* When nails become torn, split, or sharp.

* Check every week to see how long your pet’s nails are. Depending on the amount and type of exercise your pet gets will determine how quickly they need trimming.

* Trimming nails after bathing is a good time since the nails will be softer. Remember to inspect the dew claws since they aren’t worn down by exposure to the ground.

How do you trim your pet’s nails to prevent bleeding?

* It is important to clip more often and take off less nail each time to allow for the blood supply and nerves to shrink back away from the nail ends.

* Gently put pressure on the paw close to the nail bed to separate the nail from the others to see clearly where you are clipping.

* Look for the quick, (the pink area within the nail that has the nerves and blood vessels), never cut too close to this area. Cut on a 45 degree angle.

* Hold the paw near the nail gently but firmly, if you feel your pet pull away don’t clip, wait till your pet is still and comfortable.

* If you do accidentally draw blood apply a blood-clotting accelerant such as Kwik-Stop or ClotIt to slow down the bleeding. Always consult a Veterinarian if bleeding doesn’t stop quickly.

What are the tools you’ll need to clip your dog’s nails?

* You may want to consider using a dremel or nail grinder instead of clippers, or a combination of both tools.

* Buy a grinder that is quiet and has variable speeds. (Trim excess fur from around dog’s paws so it doesn’t get caught in any moving pieces).

* Clippers should be concave at the cutting edge, sharp, clean, and the right size for your dog.

* Scissor and plier-style cutters are easier to use than guillotine trimmers so experiment to find the right trimmer you are comfortable using.

* Emery boards to file sharp edges, if you don’t have a dremel.

* If your dog nips at you or gets upset, you may need a muzzle for protection.

* Lots of dog treats!!

How to reassure your pet during nailing clipping?

* Start clipping your pet’s nails when they are young every week or two, taking off small amounts of nail slowly and carefully. Make sure your dog is used to having his/her paws and nails touched.Top 5 Considerations When Clipping Your Dogs Nails

* Have treats ready for when your dog starts to get anxious. Take time to give lots of praise and petting. Stop for short periods if your dog is resisting the treatment.

* A spoonful of peanut butter on a plate will distract a puppy long enough to trim some nails if everything else fails! (Make sure peanut butter DOES NOT contain Xylitol).

If you have any reservations about how to go about clipping your dog’s nails, or are too nervous to attempt this yourself, contact Pet City Canada to book an appointment with our knowledgeable dog groomers.  Our qualified staff will groom your dog and clip their nails professionally and safely.
Top 4 Reasons You Should Try Making Your Own Dog Food and Treats


Making your own dog food and treats not only eliminates the “unknown” ingredients but is also more cost effective. “Who has time for that?!” you’re thinking. Your homemade dog food doesn’t have to be fancy, let’s face it, most dogs will eat anything! The main goal here is to make food that is HEALTHIER, not fancier. Many recipes are super easy, with only 4-8 ingredients that you probably already have at home. They can also be made in large batches and frozen for later consumption.

Research has shown that the chemicals and preservatives found in dog food and treats can cause harm to their brain, impede behaviour, and even cause aggression in some cases. According to www.petsafe.net, an international pet food crisis was to blame for kidney failure causing death in cats and dogs in 2007 because of melamine contaminated food from China. This grain by-product is a cheap alternative to protein but is a component of PLASTIC!

The best way to eliminate fillers, chemicals, and hormones from your pet’s food and treats is to make your own so you know exactly what is going into it. We try to be conscious consumers by checking labels, monitoring salt and sugar intake, and monitoring processed food intake for ourselves, so why not do the same for our little fur babies? Here are the top 5 reasons you should give making your own pet food a try:


  • THERE ARE FAR TOO MANY RECALLS

In the first 6 months of 2017, there have been more than 15 recalls on dog foods and treats in North America. You can sign up to have these recalls delivered right to your inbox from Dog Food Advisor: https://www.dogfoodadvisor.com/dog-food-recalls/. These recalls occurred because of “possible chemical contamination”, “possible salmonella”, and one even says “product may contain elevated levels of naturally occurring beef thyroid hormone”.

The reality is we cannot control the ingredients in these foods and treats, nor does every single person who purchased them receive the recall notice. The best way to avoid them is to make your own food and avoid purchasing commercial food and treats as much as possible.


  • YOU CAN TAILOR THEM TO BE HEALTHIER

Homemade dog treats are healthier because you can tailor them to your pet’s specific dietary requirements. If you have an overweight dog you might try making heart healthy snacks. You can also try ingredients that will help keep your dog’s teeth and gums healthy. Commercial chews are usually made from starches that are gummier and have the opposite effect. You can add in more vegetables and make crunchier treats which will aid in removing build up on their teeth. With the help of websites like www.balanceit.com, you can create custom meals based on your pet’s dietary requirements.


  • YOU CAN SAVE MONEY BY MAKING THEM AT HOME

You get what you pay for when it comes to most things in life and dog food is no different. If you’re looking for chemical-free, grain-free, and hormone-free treats you better start saving your pennies. Since you can choose which meat you are using, watch for sales and markdowns at your local grocer. Pair up with a friend and make a double batch to save even more. By making your pet’s food at home, you can save yourself money.


  • YOU CAN LEAVE OUT THE FILLERS

YOU CHOOSE WHAT’S IN THEM! Wanna add some omegas? Go ahead! Thinking of adding in glucosamine? Go for it! (Always check with your vet first!) You can make their food and treats super tasty with their favourite foods while maintaining the nutrition level their body needs! Some common fillers you could find in your dog’s food and treats are soy, wheat, corn, nut/seed hulls, citrus pulp, modified corn starch, weeds, and feathers. FEATHERS?! Dogs are not able to digest grains very well, so these fillers can be very harmful and lead to obesity and diabetes. They will leave your pet feeling full but they truly aren’t receiving much, if any, nutrition.


As you can see, doing your homework when purchasing pet food and treats is important to avoid unnecessary fillers and chemicals. It is equally as important to do research into the appropriate portion sizes and ingredients when making your pet food at home. There are so many easy recipes online for making your own pet food and treats. If you don’t know what foods are best for your dog’s breed, talk to your vet; they can give you good direction on how to maintain a healthy, balanced diet for your pet.


Here’s an example of a dog food recipe:

INGREDIENTS:

  • 1 1/2 cups brown rice
  • 1 tablespoon olive oil
  • 3 pounds ground turkey
  • 3 cups baby spinach, chopped
  • 2 carrots, shredded
  • 1 zucchini, shredded
  • 1/2 cup peas, canned or frozen

DIRECTIONS:

  1. In a large saucepan of 3 cups water, cook rice according to package instructions; set aside.
  2. Heat olive oil in a large stockpot or Dutch oven over medium heat. Add ground turkey and cook until browned, about 3-5 minutes, making sure to crumble the turkey as it cooks.
  3. Stir in spinach, carrots, zucchini, peas and brown rice until the spinach has wilted and the mixture is heated through, about 3-5 minutes.
  4. Let cool completely.


Here’s an example of a super easy dog treat recipe:

Ingredients

  • 32 ounces vanilla yogurt
  • 1 cup peanut butter

Directions

  1. Melt the peanut butter in a microwave safe bowl
  2. Combine the yogurt and melted peanut butter
  3. Pour the mixture into cupcake papers
  4. Place in the freezer